Have you ever wanted to create your custom acrylic keychains? Whether you’re a DIY enthusiast or an aspiring small business owner, crafting acrylic keychains is an enjoyable and potentially profitable venture. In this step-by-step guide, we’ll walk you through the entire process, from selecting materials to promoting your creations online. So, let’s dive into the wonderful world of acrylic keychain making.
Step 1: Gather The Materials & Brainstorm
The first step in making acrylic keychains is to gather all the necessary materials. You’ll need:
Acrylic Materials: You can purchase acrylic sheets from a craft store or online marketplaces like Amazon. The acrylic sheets come in various colors and thicknesses, so choose the one that best suits your design and preferences. I like using 8×10 sheets of acrylic.
Design Software: If you’re tech-savvy, you can create your keychain designs using software like Adobe Illustrator. There are also other online programs that are browser-based and easier to use for designing. However, if you prefer the tactile experience of drawing by hand, start with sketches and then digitize them later. This can help you in the brainstorming process.
Access to a Laser Cutter: You’ll need access to a laser cutter for precise cutting and engraving of your acrylic sheets. Many universities and tech spaces have laser cutters available. Make sure to request permission and, if necessary, assistance from the relevant personnel. My school has a Fab Lab with techs to assist you, and you may have one near you!
Key Rings: To make your keychains attachable, you’ll need key rings. These can be found at craft stores or purchased online. They’re fairly priced and usually sold in bulk.
Step 2: Designing Your Keychains
Now that you have all the necessary materials, it’s time to get creative. Here’s how to design your acrylic keychains:
Sketch Your Ideas: Again, begin by sketching your keychain designs on paper. This is where your creativity can run wild. Experiment with various shapes, patterns, and themes until you’re satisfied with your concepts.
Digital Design: As mentioned before, if you’re comfortable with design software like Adobe Illustrator, create digital versions of your sketches. This step allows you to refine your designs and ensure they’re suitable for laser cutting.
Sizing & Dimensions: Be mindful of the size and dimensions of your keychains. Consider factors like how big or small you want your designs to be, as this will affect the number of keychains you can create from a single sheet of acrylic. It will also affect what size acrylic sheet you buy.
Save Your Files: Save your design files in a format compatible with the laser cutter. Common file types include .ai or .pdf. This will make the laser cutting process smoother.
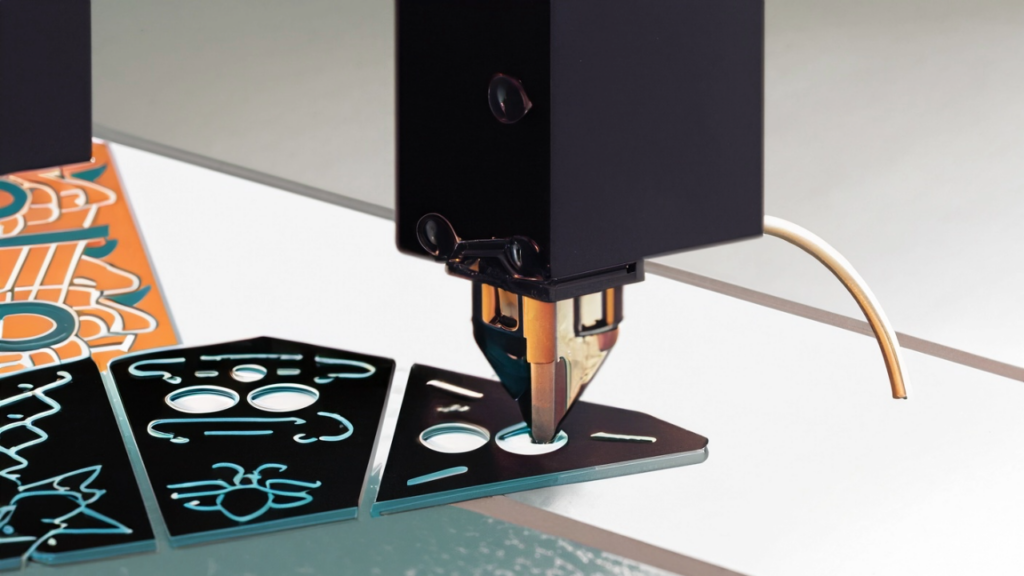
Step 3: Laser Cutting
With your designs ready, it’s time to bring them to life using a laser cutter. Here’s how to do it:
Visit a University Maker Space: Most universities have maker spaces or Fab Labs that offer access to laser cutters. Contact your university’s facilities management or art department to inquire about available resources. You may just have one!
Request Permission and Assistance: If it’s your first time using a laser cutter, please don’t be shy to ask for help. The staff or instructors can provide guidance and ensure you’re using the machine safely.
Prepare the Laser Cutter: Load your acrylic sheet onto the laser cutter’s bed. Make sure it’s secured in place and ready for cutting. Also make sure to follow all preparation steps.
Import Your Design: Import your design files into the laser cutter’s software. Here, you’ll be able to position and scale your designs as needed.
Adjust Settings: Depending on the thickness and color of your acrylic sheet, you’ll need to adjust the laser’s power and speed settings. The Fab Lab or tech room staff can help you with this.
Start the Cutting Process: Once everything is set up, press the button to start the laser cutting process. The machine will precisely cut out your keychain designs.
Quality Check: After cutting, carefully inspect your keychains. If there are any imperfections or incomplete cuts, you might need to run the process again. After cutting, you’ll be able to peel away the protective plastic on the acrylic and you will get that classic acrylic shine. The plastic also protects it from burning and changing the color.
Step 4: Adding Key Rings
With your beautifully cut acrylic keychains in hand, it’s time to make them functional. Here’s how to attach key rings:
Gather Key Rings: Purchase key rings from a craft store or an online marketplace like Amazon. Key rings come in various sizes, so choose ones that match the size of your keychains.
Thread Key Rings: Carefully thread the key rings through the holes or slots on your acrylic keychains. Ensure they are securely attached, so they won’t come off easily. You can even test the durability yourself and see what you think is best for your customers.
Step 5: Promoting Your Creations
Now that you have a collection of stunning acrylic keychains, it’s time to share your work with the world. Here’s how to promote your creations:
Document the Process: Capture high-quality photos and videos of your keychain-making process. This content can be used to engage your audience on social media and showcase the craftsmanship behind your products.
Create an Online Presence: To start selling your keychains, you can set up a website. Platforms like WordPress offer user-friendly website-building tools. Alternatively, consider creating a shop on popular e-commerce platforms like Etsy, which is tailored for selling handmade and unique products.
Market on Social Media: Use social media platforms like Instagram, Facebook, Tik Tok and Pinterest to share your keychains and interact with potential customers. Consistent posting and engaging with your audience can help you build a dedicated following.
Collaborate with Influencers: Collaborating with influencers in the niche can help you reach a broader audience. They can review your keychains and provide valuable exposure. This may take a while to be able to do, but it’s possible.
Participate in Local Events: If you have the opportunity, join local craft fairs or markets to showcase and sell your keychains in person. It’s an excellent way to connect with your community and get immediate feedback.
Starting a journey into acrylic keychain making is an exciting and rewarding endeavor. With the right materials, creativity, and a touch of marketing, you can turn your passion into a profitable venture. Remember that success may take time, so stay dedicated, continue refining your craft, and enjoy the process of bringing your unique designs to life. Whether you create keychains for personal use or to share with others, the joy of crafting and sharing your art is truly special. Happy crafting!